SQL Query
DECLARE @tbl TABLE
(
Id INT,
Name VARCHAR(100),
Year INT,
Amount INT
)
INSERT INTO @tbl(Id, Name, Year, Amount) VALUES(1, ‘Alex’, 2000, 2010)
INSERT INTO @tbl(Id, Name, Year, Amount) VALUES(1, ‘Alex’, 2001, 2020)
INSERT INTO @tbl(Id, Name, Year, Amount) VALUES(1, ‘Alex’, 2002, 2030)
INSERT INTO @tbl(Id, Name, Year, Amount) VALUES(1, ‘Alex’, 2003, 2040)
INSERT INTO @tbl(Id, Name, Year, Amount) VALUES(2, ‘Russell’, 2002, 2010)
INSERT INTO @tbl(Id, Name, Year, Amount) VALUES(2, ‘Russell’, 2003, 2020)
INSERT INTO @tbl(Id, Name, Year, Amount) VALUES(2, ‘Russell’, 2004, 2030)
INSERT INTO @tbl(Id, Name, Year, Amount) VALUES(2, ‘Russell’, 2005, 2040)
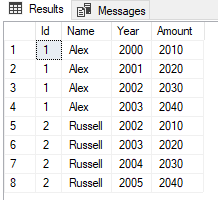
SELECT * FROM @tbl
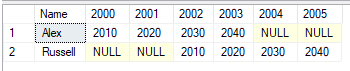
Basic Output
SELECT Name, [2000], [2001], [2002], [2003], [2004], [2005]
FROM (SELECT * FROM @tbl) AS P
PIVOT (
SUM(Amount) FOR Year IN ([2000] , [2001], [2002], [2003], [2004], [2005])
) AS PT
PIVOT Output